

Label Printing Woes
A new prospect contacted me for a solution to his label printing woes. He described his situation as a logistical nightmare, due to the fact that they were printing labels for 3800 different part numbers, and having trouble ascertaining the packaging instructions required for each part number. The prospect is an existing Bartender 10 user, who most likely purchased his software from a catalogue house rather than from a value added reseller. The software was not set up to be used to its full potential.
Scan a Barcode to Auto Populate the Data
The prospect wanted the ability to scan a barcode part number and have that part number print on the label. He also wanted the part number’s description, gov’t CAGE code, and serial number to be printed on each label. Finally, each part number may have its own set of packaging instructions. These instructions would somehow need to be presented along with the label printing.
When the operator was ready to print labels he would open the label format, enter the part number, then he would enter the other fields of data. After he printed the labels, he would then have to ascertain which packaging instructions to associate with each label job. Obviously, for handling 3800 different part numbers, this method was too laborious and error prone.
Step 1: Create a Database to Import Label Data at Print Time
The first line of business here was to create a simple database to house all of the part numbers. Each part number’s database record would include columns for P/N, Description, Customer P/N, Cage Code, and Qty per Unit. I also included a “packaging instructions” column, which would associate instructions pertaining to each part number. I set this up in Excel, to be used as a database file.
Step 2: Create the New Label Format Utilizing Fixed and Variable Data Fields
The next step was to re-create the label format in Bartender. The label format was a 3” x 1” size, and required both fixed data fields and variable data fields. The fields that remain the same across all label jobs are referred to as fixed data fields—the data remains static. They had their company name, a Made In USA field, and the P/N and S/N text as the fixed fields. Variable fields were the P/N, Description, Customer P/N, Cage Code, and serial number for each batch of labels.
Bartender’s Auto Alignment Feature
Bartender made it easy to accurately place the fields onto the format. While dragging a field into place, some background rulers lit up to show and help align with the other fields. This negated having to “eyeball” where to drag the fields to, and resulted in quick, perfectly aligned fields. This is a nice feature to have when you are designing a lot of label formats, or designing formats that require a lot of fields.
Step 3: Connect the Label Format to the External Database
Both Bartender and Nice Label Designer had their database connection wizards appear when I attached each of the variable fields to the Excel Database file. Both wizards were clear, quick, and worked like a charm. The database was then connected to the label format.
Step 4: Create Field Prompts for User-Friendliness
The next consideration was how the label format was presented to the printer operator. Any field could be set up as the main reference field, and fields could be set up to prompt the operator to enter or scan in data. In this case, the main key field which was the Part Number would be used to search for the required record. This field was set up as a “prompt for data field”, which would appear on the print dialogue box as the first screen prompt. The other variable data fields were set up to be automatically pulled into the label format at print time. The other prompt for data field I set up was the serial number field. That data was not known until print time, so a starting number for each label batch would be manually entered.
The New Enhanced Label Printing Procedure
So, now the operator would receive notice to print labels for a particular job. For this example, he was required to print P/N 56-4000-02. He opened the label format, and upon pressing the print button, the print dialogue screen popped up, prompting for P/N and serial number. I had also created a bar code list of part numbers that could be used to scan with a simple USB bar code reader. With the cursor blinking in the P/N field, waiting to accept data, bar code 56-4000-02 could be scanned, or the number could be manually entered into the prompt field.
Once the part number was selected, the software looked to the Excel database, scrolled down to the proper P/N, looked across that particular record, and pulled in the data to the fields we set up and linked to prior. So in this case once P/N: 56-4000-02 was entered, the rest of the variable data fields on the label were instantly populated with description, Cage Code, and Customer P/N. The operator then was provided with the serial number sequence for that batch, and all he had to do was enter the starting serial number, then the number of labels to be printed.
Step 5: Include Packaging Instructions on the Print Dialogue Screen
So far so good, except for the final step, I had to somehow import the records’ packaging instructions to appear on the print dialogue screen. With Bartender, I had assumed I would be able to import data fields into the print dialogue box. But outside of writing some custom script, I was not able to achieve this last step with Bartender.
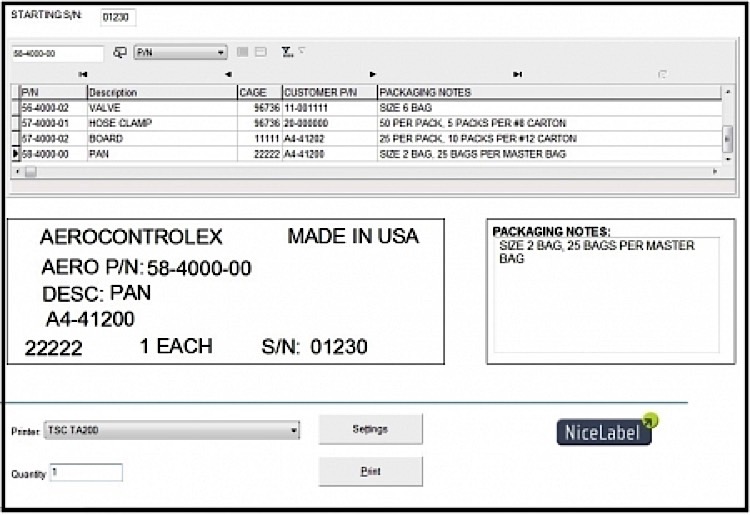
Niceforms: User Friendly and Reduced Printing Errors
I then opened my copy of Nice Label Designer 6, and re-designed the label from scratch. I was able to easily connect to the external database, and setting up the serial numbering was a bit more intuitive with the Nicelabel software. Once I had the label prompts working properly I saved the format and opened the EasyForms feature. EasyForms allows for simple creation of spiffy print dialogue boxes, which results in a more user friendly experience for the operator. This form feature also allowed me to import the packaging instructions data directly onto the print dialogue box. This feature was previously only available in the $995 Nicelabel Suite package, but with version 6, they now offer basic form generation in the $495 package. It is not as comprehensive as their prior “NiceForms” module, but it works well. For those requiring more advanced form design, the way to fly is with the new $995 NiceLabel Powerforms package.
In this case, both Bartender 10 and NiceLabel Designer Pro 6 were able to painlessly create the label format, and link to the external database to import the proper data at print time. This use of imported database data reduces operator input, and reduces printing errors. Now when the desired part number is scanned or entered in the prompt box, the rest of the fields on the label are auto populated, and the changes can be seen immediately in the user friendly print dialogue box, including the label sample itself! In addition, the corresponding packaging instructions are imported onto the print dialogue screen(form).
While both packages are impressive in their own right, the form feature offered by NiceLabel enabled me to present the exact solution that was required by the prospect.
Contact George Righter today for help with label printing and Nicelabel software. 215-493-7191 or e-mail
Published: